
As promised, for those of you that are interested, I am writing a blog on how to turn a Toyota Hiace van into a camper that will take us around Australia for the next few months. When we first thought about leaving the home comforts of Glen Ewin in Adelaide, we had to weigh up the options.
Option 1 – Buy a car for maximum $3000 and drive around the country staying in hostels. This was the most viable and simplest option, however after establishing that a private hostel room is around $75 per night and even $60+ for a dorm, princess Evie though doesn’t fancy dorm life though so it would be the more expensive option. This would be as I say an easy option, but the thought of speeding $750 in just 10 days of travel, didn’t excite us at all.
Option 2 – Bus travel. This is a very popular choice for backpackers around Australia and New Zealand. This is probably the cheapest option, although the price of hostels would be the same. Now we didn’t actually do any research into the price of this because it really wasn’t an option that would go for, just a passing thought.
Option 3 – Buy a camper, this would be another easy option that gave us all of the freedom we wanted, would involve no work, we could just buy it and go. The negative side to this after doing some research, was that the price of campers was so expensive, because everyone wants them. For anything in our price range, they were very old and had racked up hundreds of thousands of kilometres, so unreliable to say the least. Another variant of this was to buy a 4×4 with a rooftop tent or buy one without and put one on, for a while this really excited me and we found one for $5000 which was really above our price range, but it was pretty cool, it was sold before we got to see it though, but the idea was still my favourite.
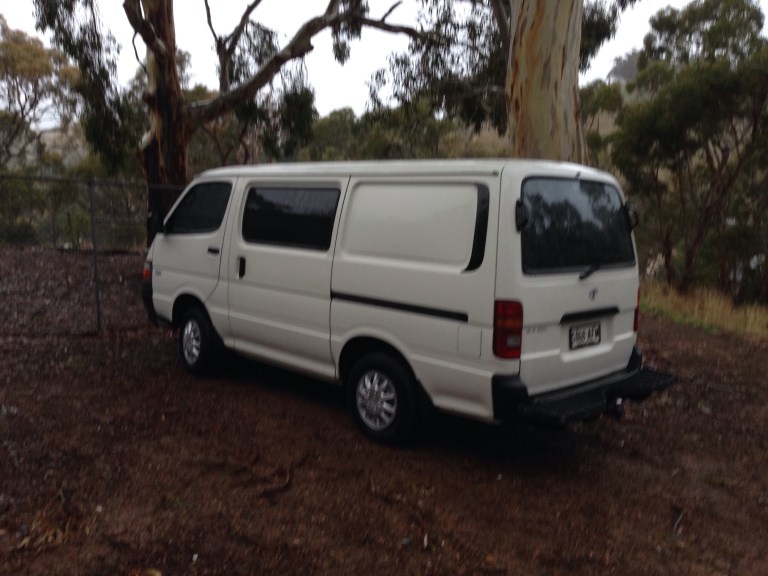
Option 4 – Buy a van and turn it into a camper, obviously the one we ended up opting for and also our first idea when we starting looking into our choices. We almost gave up on the idea after finding that vans in our price range had racked up way to many miles, but the idea was to buy a van and then spend an extra $1000 kitting it out for our journey. Our luck came around when our landlords nephew, who’s a used car dealer, called to say that a van and come into his yard and he knew we were looking for one. As luck would have it, we had planned to go down to his yard that day and see what he had on offer, so we popped down and ended up driving off with a 2004 Toyota Hiace for $4000, result!!! This was the top end of the budget, but it was too good an offer to turn down, compared to the other vans we had seen with this mileage (210,000km) going for a minimum of $6000. We were slightly sceptical, but as I speak, the van is running like a charm.
So we obviously went for option 4, but really any of the other options are good ideas, just depending on what you want from your trip and what your budget is. Now by choosing to build our own camper, there was a serious issue to contend with… neither of us are carpenters. I got a D in GCSE ‘resistant materials’ and as far as I remember I just scraped that for my idea of a revolving DVD cabinet, but not for the finished product, which was promptly binned after I left school. Luckily for me, Bill at Glen Ewin had told me to make use of all of the tools available in the sheds and any scrap wood that I could make use of.
The simplest idea with the van, would have been to stick a raised platform across the whole thing above the internal wheel arches, stick a mattress on top and use the underneath as storage. For some stupid reason though, we both had grand ideas of making into an interchangeable day and night time space, with a bench that would fold into a bed, still with the storage beneath. We drew a few blueprints on scrap pieces of paper (over a bottle of wine of course) and made up our mind on the layout. We would have the bench/bed, the mechanics of which I was still to figure out, with a fold down table in front of it, a cabinet in the corner behind the drivers seat, built in boxes around the rear passenger side wheel arch and enough room for a large ice box and a water tank, as well as all of our clothes and rubbish we’ve accumulated over the time we’ve been away. A simple task!
The first thing we did was get the van serviced, fingers crossed it wasn’t a dud and would only cost us the $160 quoted. No such luck, it wasn’t a dud, but the brakes were below the legal limit, so we forked out $550 to have all of them replaced on top of the service fee. Oh well, at least we know it will stop in an emergency now and the engine is in good nick so thats the main thing. When we got the van back, I parked it in the big shed at Glen Ewin, opened up the boot…. and scratched my head, for a long time. I could and am good at visualising how I wanted it to look, which helps and although I’m no carpenter, I have worked with a lot of them over the years, so I know my hacksaw from my chop-saw and all the lingo that goes with the trade. I had also spent a lot of time, usually whilst lying in bed with sleeping beauty next to me, researching ways to convert the van and watching videos of other people who had done the same thing.
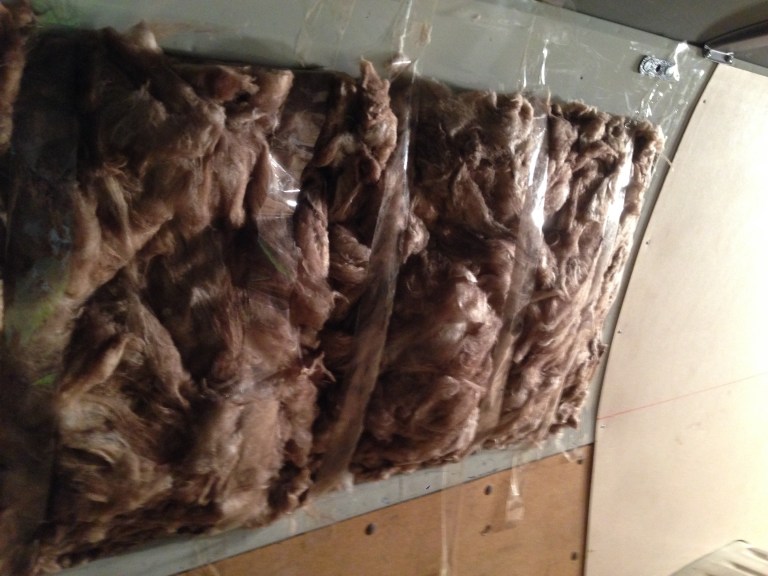
We were both still set with the idea of having a bench that converted to a bed, so that was what we would aim for. First thing I learned from my research was that I should insulate the van, this is something I’ve worked with before, so I took off all the removable panels inside the van and the side door and stuffed them with rock wool insulation before replacing the panels, for the parts that didn’t have removable panels I would cut the insulation and tape it temporarily once I was ready to deck the walls out. Also I would insulate the floor before I put the decking in. As I said, Bill had let me help myself to any materials I could make use of which helped a lot, I did have to buy some 7mm ply for the flooring and some 3mm MDF for the walls, cue the first of very many trips to Bunnings Warehouse.

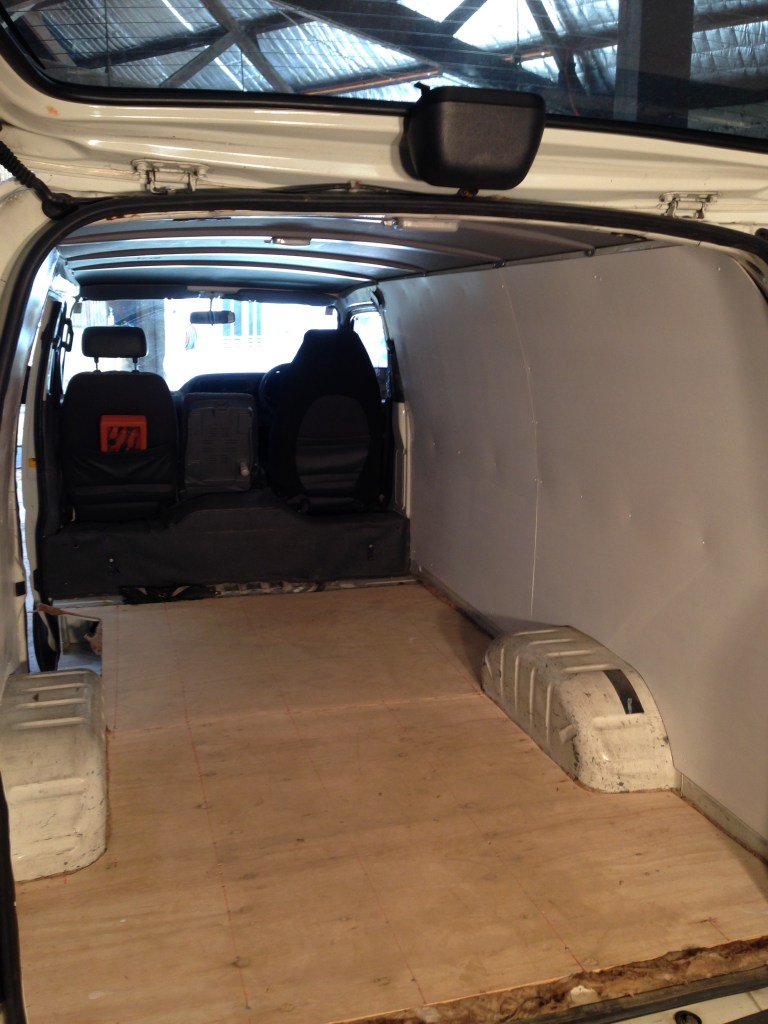
Peter from Willabrand had offered to come in and help me on the first day of the real build, this was fantastic, not only did he have more of an idea of how to get started, but it was really handy to have someone to discuss my visions with (sounds like I was hallucinating). So with my ply and MDF ready, Peter came in to help and straight away we hit a snag. I had bought metal stews that were too long to screw into the floor, because they probably would have gone through the fuel tank. So back to Bunnings, quick sausage sandwich, mental fuel, new screws and we were ready to start. First of all we cut out a template from cardboard for the flooring, which we then transferred onto the ply and cut with a skilsaw and a jigsaw. Because of the dimensions of the van, unfortunately I had to fork out for 2 full size pieces of ply. So with big plans to fit out the whole thing in no time at all, we thew the insulation down and placed the ply over the top.
We had to mark along where the screws would take hold and then drill down through before screwing. This was a very slow process, firstly we had to weigh it down so that the insulation flattened out, then trying to fix the edges down before we went through the centres. Unfortunately, there wasn’t much room for error when drilling through, cue breaking every drill bit we had. The day flew by and soon enough Peter had to leave me to it. He was an awesome help, and luckily would be around most days to check up on my progress and give me some extra pointers. I had to bite the bullet and go back to Bunnings for more drill bits, but had a brainwave when I saw self-drilling metal screws, I knew these existed but I had obviously forgotten when I was purchasing the other ones and breaking drill bits. So forget the drill bits, I got back to the van and had the floor screwed down in no time, why I didn’t just do this in the first place I don’t know.

The next day I was on my own but confident I could get the walls done, It was just a case of making some cardboard templates again, mainly around the wheel arches and the transferring them to the 3mm MDF. I used this mainly because it would flex to the curve of the van, but also anything thinker would have meant a loss of space inside. This was a simpler task than the floor and I managed to get it done by myself in a day. I had to screw to the walls with some small metal screws so as not to poke through the outside but it was pretty simple, lots of going back and forward trimming little bits off and sanding others bits to make it fit nicely so luckily I’ve got patience.
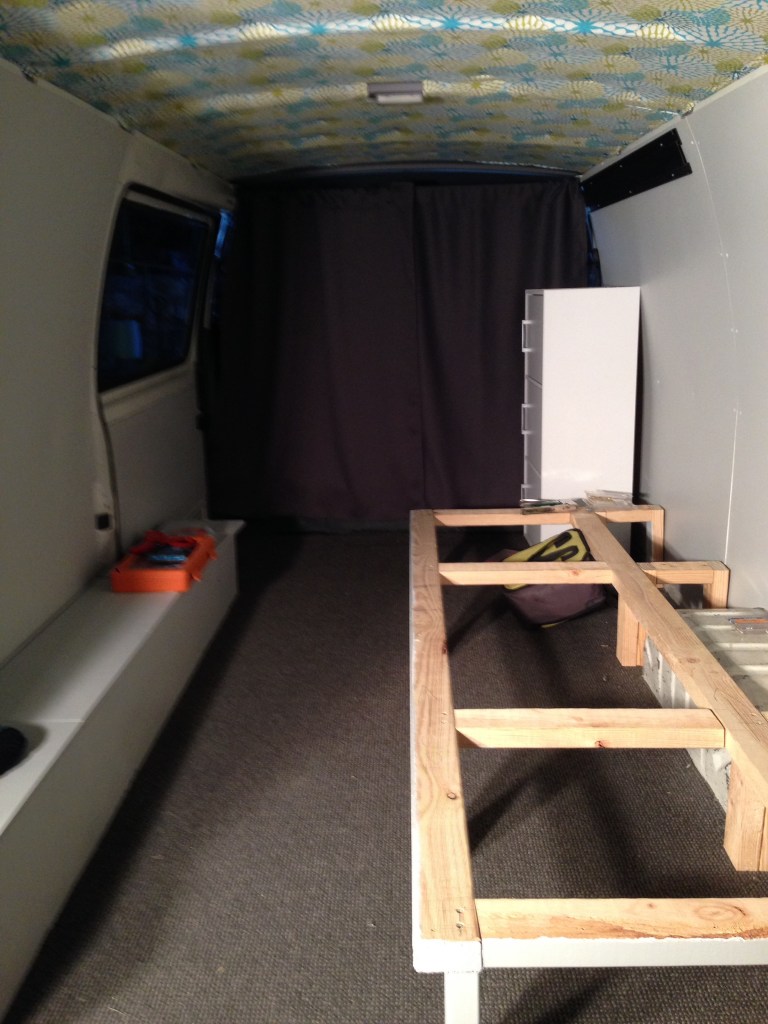
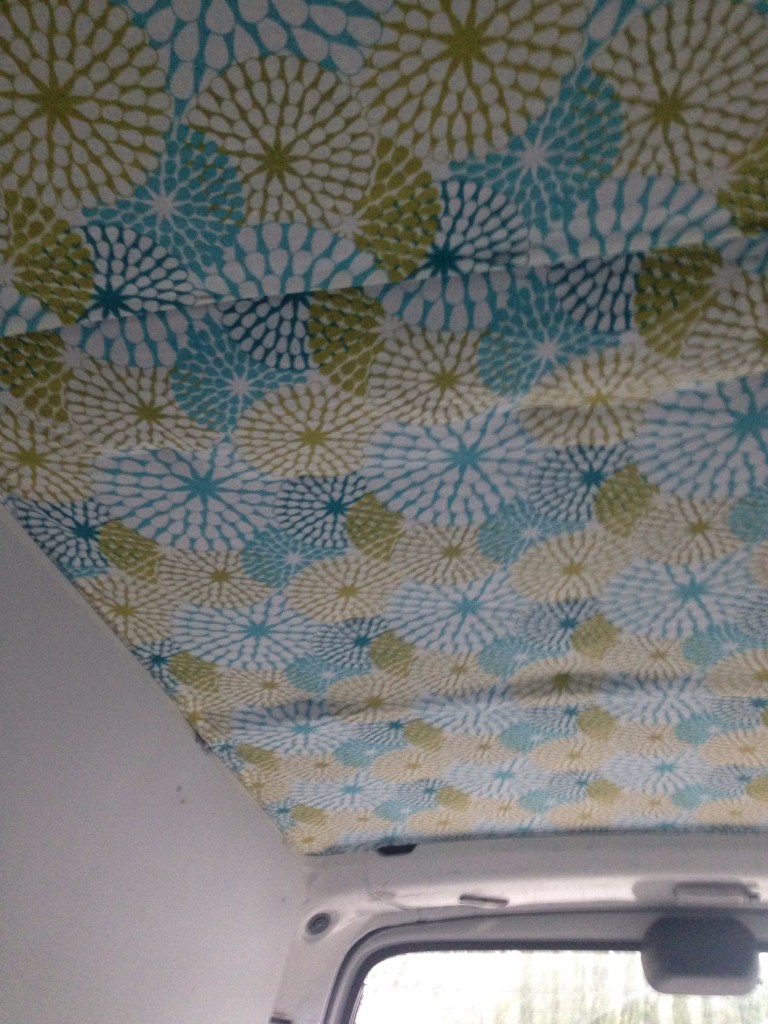
The weekend was with us which meant we were working the whole time, but I managed to get an undercoat on the walls to prepare them for when we eventually paint the whole thing. There was lots of shopping to be done too. Evie had chosen a paint colour so we were on a mission to find the fabrics for the curtains and ceiling that would go well with the walls. We headed to spotlight and bought 3 different fabrics, 2 of which Evie would turn into curtains, one style for the windows and one to separate the front of the van from the rear. The third fabric we would use to cover the ceiling.

When we eventually got back to work on the van, Evie busy making the curtains with a borrowed sewing machine, me trying to work out the logistics of the bed. I decided to firstly box in one side of the van over the wheel arch, this would have 2 purposes, one to support the bed base and the other to act as storage boxes. I made the boxing out of 9mm MDF I found in the scrap wood pile, shaping it around the various angles along the inside of the van, securing it down with some batons screwed to the floors and the boxing itself. Eventually I managed to completely secure the wheel arch in with two lids either side for storage. The length of it was 1800mm, slightly short of the length of the mattress, but a slight overhang won’t matter and it means easier access to the side door.
Another day down. I went back the following day to make the main bed frame. Peter helped me again for a while, and it was mainly made from scrap 3×2, various screws, some bought some borrowed, resident handyman Claude was the go to guy for anything I needed and always happy to lend me what I needed, seems he has everything in his ute. I made the bed/bench structure 1900mm long by 750mm wide so it came halfway across the van. It has 8 legs, which seperate 3 different sections to use as storage. This was built alongside the edge of the wheel arch at a height so that once there was ply on top, it would match up with the height of the boxing on the other side.

I had to put some extra supports either side of the wheel arch to support the corners of the bed which were a bit of a pain, with the different angles again on the sides of the van. Once the bed/bench base was made, I had to make the structure that would support the other half. I had decided, after much research, to go for some legs that slid out at the same points as the existing legs. So I started by making what are essentially boxes that sit beneath the bed and surround the front legs, so they slide out when needed and tuck away during the day. I was very pleased with my efforts until I realised that it wouldn’t work completely. Because they tucked away under the bed, it meant that the legs were 2 inches shorter than the bed base, more head scratching until I figured out I could make some supporting beams that sat in top of the sliding legs. For this I used 4×2, being an Inch wider, they would span the sliding legs and could sit in the boxing with a beading to lock them in place. Confusing I know, believe me more time was spent thinking than doing, the video shows how it works. After cutting a second bit of ply that would sit on top of the bench during the day and pull out to form the bed in the evening, the bed was done, but it all had to come out so that I could fit the carpet.

Before carpeting, Evie painted the interior walls and boxing with 2 coats of mould proof paint while I probably was back at Bunnings on my twice daily trip for bits and bobs. I also used this time to fit weathershields on the front windows, so that we could open the windows in the evening for ventilation, but keep any rain out. Once the walls were dry, we used a staple gun to attach the ceiling fabric to the ceiling. To insulate it slightly, we used bubble wrap under the fabric and then stapled away. It looked great and with a bit of neck ache I then cut and fitted the carpet, an off cut which we had acquired from a carpet shop in town and was just big enough to cover the whole floor. I used glue to stick it down, then weighed it down with boards and a load of 50lb bags of sugar, borrowed from Willa.
The following day, I stapled parts of the carpet down that wouldn’t be seen, screwed over the step on the side door and used some black tape to cover up a small patch I had cut short, whoops! Now I was ready to screw the bed/bench down. I used some metal angled supports that screwed to the inside of the legs and down through the carpet and into the ply beneath. This meant taking the top off the bed so I could screw down into the floor. Once it was secure I had to dismantle the sliding legs so they could be reassembled under the bed, with the carpet now in place though, they didn’t fit, so I chopped a bit off the bottom so they fit snug and eventually got them in. We had painted all of the components of the bed before it went in too.
Annoyingly the van does not come with a handle on the inside of the back door. So with a little bit of thought, some rope, a gutter fixing and a bit of rubber, I managed to fashion an opening device and a handle to open/close the door when we are inside at night.

We purchased a 3 door cabinet which I screwed to the floor and wall in the corner behind the drivers seat and bought an aluminium plate which I screwed to the wall above the cabinet with various baskets and hangers on. In the mean time Evie had cut the foam queen mattress we had bought, slightly off centre so that it could sit up as the back of the bench in the daytime. She sewed some extra fabric over the exposed pieces of foam to protect them and create two seperate pieces for easier movement.


With all of the components now securely fitted, we just had to fill it with all of our stuff and bits we had purchased to make this Hiace into our home. This included a large Esky (ice box), a 2 gas burner and gas bottle, 10L jerry can, 10L water container, various cooking utensils, crockery, 3 under bed pull out draws for our clothes and things, some hanging storage bags which fit on the back of the front chairs, some picnic chairs and lots of wine to keep us going. Everything found its place and it was ready to go.
We had a naming ceremony to call our van Horace II, after Glen Ewin’s resident whippet, with plans to smash a bottle of champagne on the side, instead we put it in the esky to enjoy on our first night out in the wild. We had plenty of advice and help from various people at Glen Ewin, Willa definitely helped me to scratch my head a bit less, Peter gave up lots of his time to come and help me, I owe you a beer or ten, Claude and Bill both lent me various tools and Bill gave me access to any materials I could make use of, so this helped to keep the cost down and sped things up, even though I still ended up at the builders merchants most days. Wendy helped to source the carpet and offered us fabrics, all in all it was a team effort and the outcome we are very pleased with.


Overall we probably spent near $5,500 getting the van to how it is today, maybe one day we’ll put a roof rack on top and an awning for shelter, but for now we have our home and hopefully will be able to get a decent return on it once we come to sell it at the end of our travels.

Awesome! I want one🚐
LikeLike
You guys are amazingly resourceful.
LikeLike
Hi Evie and Ryan I am very impressed with all your DIY skills, you can always get jobs as carpenters, plumbers, painters, and take in sewing !! I am sure you will get a good price for Horace when you have to say goodbye. Love Grannie. 🔩 🔨 🍾 👍 😄 😄
LikeLike